第24章:実装② Machine API(send方式)にする📮
この章は「Reducerは書けるようになったけど、使う側がまだ面倒…」を解決する回だよ〜!☺️ send(event) だけで状態が進む、使いやすい“機械っぽいAPI”を作ろう🧠⚙️
1) まずゴール確認🎯「使う側」を超ラクにする

Reducer直呼びだと、使う側がこうなりがち👇😵💫
- 現在stateをどこかに保持しないといけない
- 遷移したらUI更新しないといけない
- 副作用(APIとか)を呼び忘れる/二重に呼ぶ
- ログ取りたいけど散らかる
そこで Machine API にして👇に統一するよ✨
machine.send(event):イベントを投げるだけ📮machine.getState():いまの状態を見る👀machine.subscribe(listener):状態変化を購読できる📡- (できれば)Effectもついでに回せる🎛️
2) 今回の設計ルール(超だいじ)🛡️✨
ここだけ守ればかなり安全になるよ😊
- ✅ Reducerは純粋:I/O禁止(fetch / localStorage / setTimeout しない)🙅♀️
- ✅ 副作用はEffectとして“指示書”を返す(例:
{type:'submitForm', ...})📄 - ✅ Machineは薄いラッパー:状態保持・通知・Effect実行の“交通整理係”🚦
- ✅ sendは唯一の入口:状態を書き換える手段を1つにする🔒
3) まずは型を用意しよ🧩(小さめフォーム例📨)
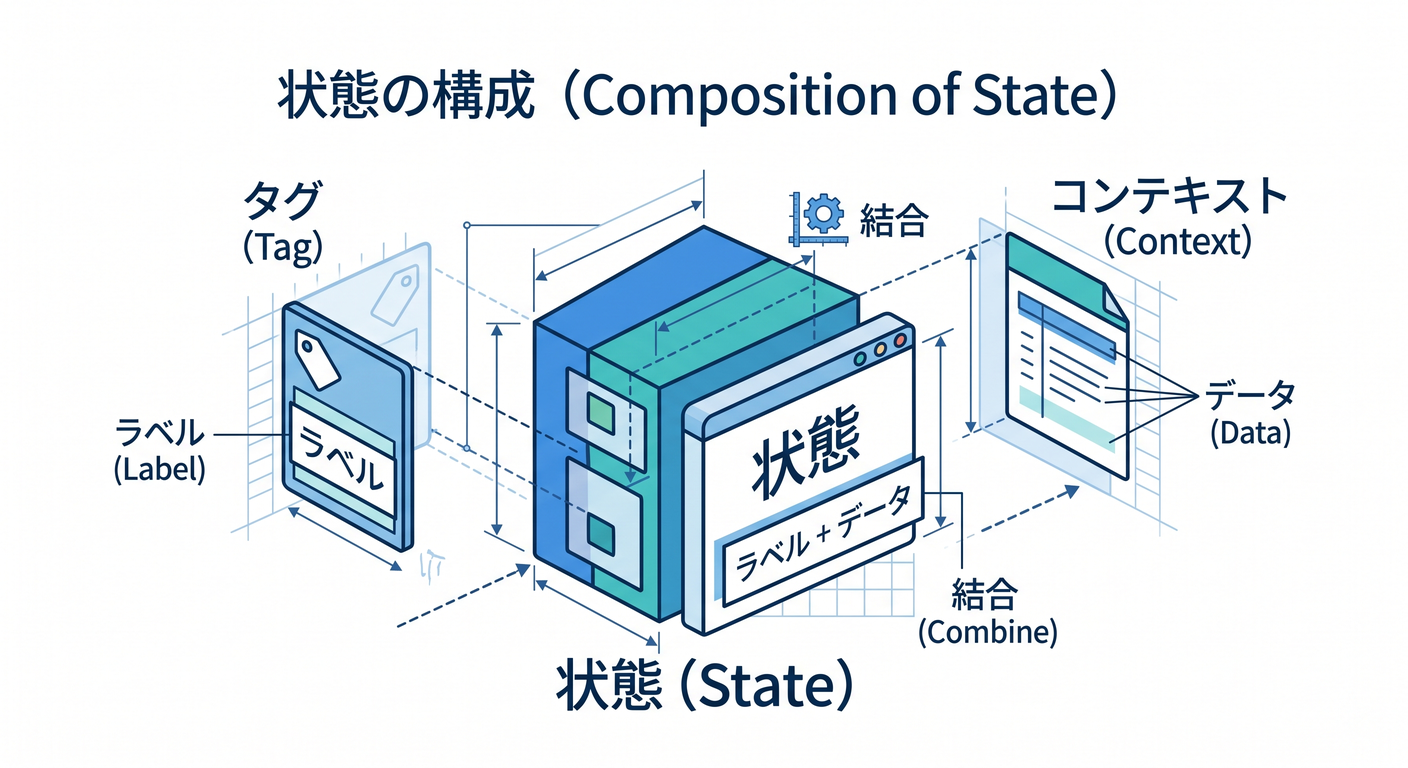
題材:フォーム送信(editing → submitting → success / error)😊
// types.ts
export type Context = {
  name: string;
  email: string;
};

export type State =
  | { tag: "editing"; ctx: Context }
  | { tag: "submitting"; ctx: Context; requestId: string }
  | { tag: "success"; ctx: Context }
  | { tag: "error"; ctx: Context; message: string };

export type Event =
  | { type: "EDIT"; field: "name" | "email"; value: string }
  | { type: "SUBMIT" }
  | { type: "SUBMIT_SUCCESS" }
  | { type: "SUBMIT_FAILURE"; message: string }
  | { type: "RESET" };

// 副作用の“指示書”
export type Effect =
  | { type: "toast"; message: string }
  | { type: "submitForm"; requestId: string; payload: Context };
4) Reducer(状態遷移の中心)を書く🍰
send方式でも、中心は変わらず (state, event) → {state, effects} だよ✨
// reducer.ts
import { Context, Effect, Event, State } from "./types";
const isValidEmail = (email: string) => email.includes("@");
export type ReduceResult = { state: State; effects: Effect[] };
export function reducer(state: State, event: Event): ReduceResult {
switch (state.tag) {
case "editing": {
if (event.type === "EDIT") {
return {
state: {
tag: "editing",
ctx: { ...state.ctx, [event.field]: event.value } as Context,
},
effects: [],
};
}
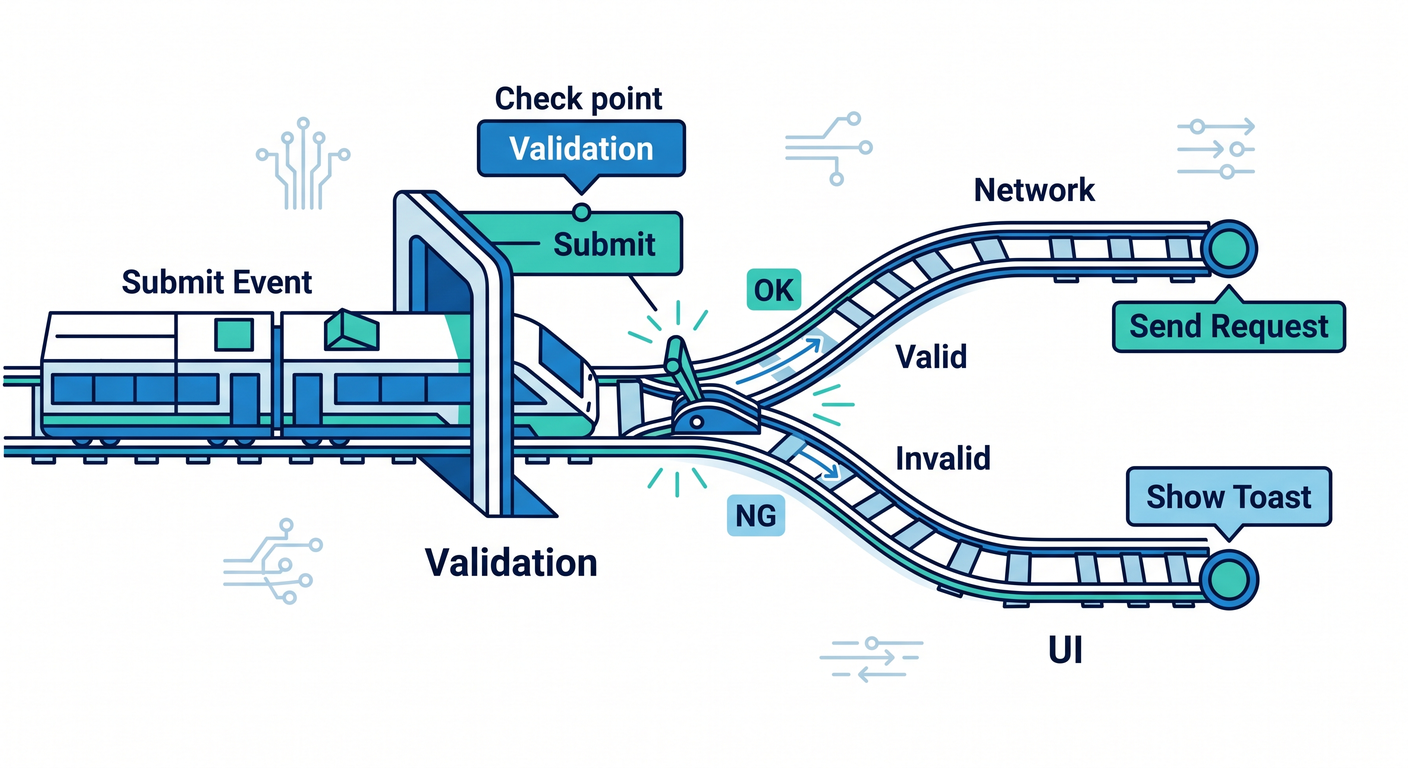
if (event.type === "SUBMIT") {
const { name, email } = state.ctx;
if (!name.trim()) {
return { state, effects: [{ type: "toast", message: "名前が空だよ〜😭" }] };
}
if (!isValidEmail(email)) {
return { state, effects: [{ type: "toast", message: "メールがそれっぽくないよ〜📧💦" }] };
}
const requestId = crypto.randomUUID();
return {
state: { tag: "submitting", ctx: state.ctx, requestId },
effects: [{ type: "submitForm", requestId, payload: state.ctx }],
};
}
return { state, effects: [] };
}
case "submitting": {
if (event.type === "SUBMIT_SUCCESS") {
return { state: { tag: "success", ctx: state.ctx }, effects: [] };
}
if (event.type === "SUBMIT_FAILURE") {
return { state: { tag: "error", ctx: state.ctx, message: event.message }, effects: [] };
}
return { state, effects: [] };
}
case "success": {
if (event.type === "RESET") {
return { state: { tag: "editing", ctx: state.ctx }, effects: [] };
}
return { state, effects: [] };
}
case "error": {
if (event.type === "RESET") {
return { state: { tag: "editing", ctx: state.ctx }, effects: [] };
}
return { state, effects: [] };
}
}
}
5) ここが本題!Machine API(send方式)を作る📮⚙️
ポイントは3つ💡
- 状態を内部に持つ
- sendでReducerを回して状態更新→購読者へ通知
- effectsを返す(or 自動実行する)
5-A) まずは「effectsを返すだけ」版(超わかりやすい)😊
// machine.ts
export type Reducer<S, E, Eff> = (state: S, event: E) => { state: S; effects: Eff[] };

export function createMachine<S, E, Eff>(opts: {
  initial: S;
  reducer: Reducer<S, E, Eff>;
}) {
  let current = opts.initial;
  const listeners = new Set<(s: S) => void>();

  const getState = () => current;

  const subscribe = (fn: (s: S) => void) => {
    listeners.add(fn);
    fn(current); // 最初に1回流すとUIが楽だよ✨
    return () => listeners.delete(fn);
  };

  const send = (event: E) => {
    const result = opts.reducer(current, event);
    current = result.state;
    for (const l of listeners) l(current);
    return result; // effectsは呼び出し側が回す
  };

  return { getState, subscribe, send };
}
使う側イメージ(effectsを手動で回す)🎛️
// usage-basic.ts
import { createMachine } from "./machine";
import { reducer } from "./reducer";
import { Effect, Event, State } from "./types";

const initial: State = { tag: "editing", ctx: { name: "", email: "" } };

const machine = createMachine<State, Event, Effect>({ initial, reducer });

machine.subscribe((s) => console.log("STATE:", s.tag, s));

function runEffect(effect: Effect) {
  if (effect.type === "toast") {
    console.log("TOAST:", effect.message);
  }
  if (effect.type === "submitForm") {
    console.log("SUBMIT:", effect.requestId, effect.payload);
    // ここではまだ送信しない(次で自動化するよ✨)
  }
}

const r1 = machine.send({ type: "EDIT", field: "name", value: "こみやんま" });
r1.effects.forEach(runEffect);

const r2 = machine.send({ type: "EDIT", field: "email", value: "test@example.com" });
r2.effects.forEach(runEffect);

const r3 = machine.send({ type: "SUBMIT" });
r3.effects.forEach(runEffect);
6) さらに便利!「EffectもMachineが自動で回す」版🚀✨
“使う側がeffects回し忘れる問題”を根絶できるよ🧯
// machine-with-effects.ts
export type Reducer<S, E, Eff> = (state: S, event: E) => { state: S; effects: Eff[] };
export type RunEffect<Eff, E> = (effect: Eff, send: (event: E) => void) => void | Promise<void>;

export function createMachine<S, E, Eff>(opts: {
  initial: S;
  reducer: Reducer<S, E, Eff>;
  runEffect?: RunEffect<Eff, E>;
}) {
  let current = opts.initial;
  const listeners = new Set<(s: S) => void>();

  const getState = () => current;

  const subscribe = (fn: (s: S) => void) => {
    listeners.add(fn);
    fn(current);
    return () => listeners.delete(fn);
  };

  const notify = () => {
    for (const l of listeners) l(current);
  };

  const send = (event: E) => {
    const result = opts.reducer(current, event);
    current = result.state;
    notify();

    // ✅ ここでEffectを自動実行
    if (opts.runEffect) {
      for (const eff of result.effects) {
        void opts.runEffect(eff, send);
      }
    }

    return result;
  };

  return { getState, subscribe, send };
}
7) Effect実装例:fetchで送信して、結果をsendで戻す📨➡️📮
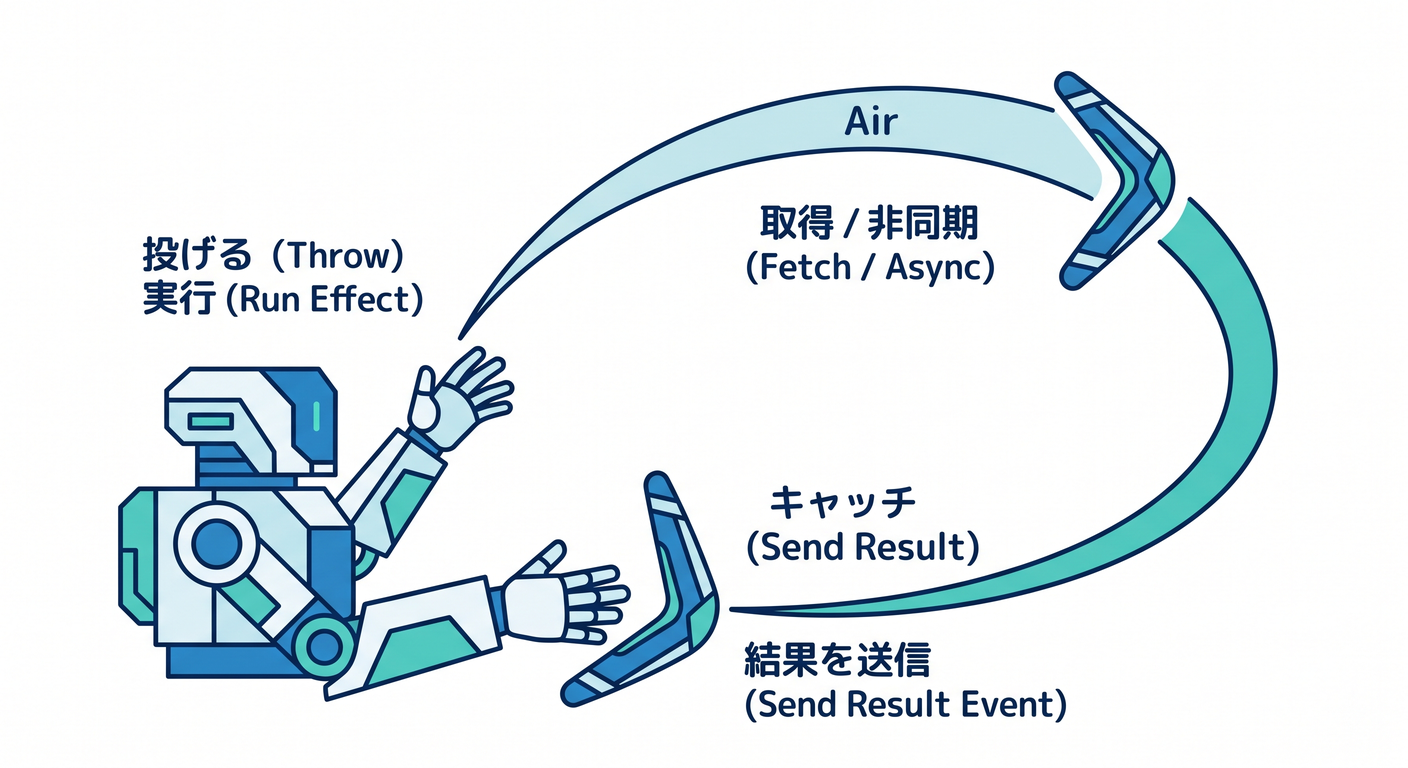
キャンセルやタイムアウトは次章で本格的にやるけど、ここでは雰囲気だけ先取り☺️
AbortController はWeb標準で、fetch等の中断に使えるよ🧯📡 (MDN Web Docs)
// runEffect.ts
import { Effect, Event } from "./types";

export const runEffect = async (effect: Effect, send: (e: Event) => void) => {
  if (effect.type === "toast") {
    // UIならtoastライブラリに置き換えてOK✨
    console.log("TOAST:", effect.message);
    return;
  }

  if (effect.type === "submitForm") {
    const controller = new AbortController();

    try {
      const res = await fetch("/api/submit", {
        method: "POST",
        headers: { "Content-Type": "application/json" },
        body: JSON.stringify(effect.payload),
        signal: controller.signal,
      });

      if (!res.ok) {
        send({ type: "SUBMIT_FAILURE", message: `送信失敗…(${res.status})` });
        return;
      }

      send({ type: "SUBMIT_SUCCESS" });
    } catch (e: any) {
      if (e?.name === "AbortError") {
        send({ type: "SUBMIT_FAILURE", message: "キャンセルされたよ🧯" });
        return;
      }
      send({ type: "SUBMIT_FAILURE", message: "通信エラーだよ〜😭" });
    }
  }
};
Machineに接続するとこうなる(使う側が激薄になる😍)
// usage-auto.ts
import { createMachine } from "./machine-with-effects";
import { reducer } from "./reducer";
import { runEffect } from "./runEffect";
import { Effect, Event, State } from "./types";

const initial: State = { tag: "editing", ctx: { name: "", email: "" } };

const machine = createMachine<State, Event, Effect>({
  initial,
  reducer,
  runEffect,
});

machine.subscribe((s) => console.log("STATE:", s.tag));

machine.send({ type: "EDIT", field: "name", value: "こみやんま" });
machine.send({ type: "EDIT", field: "email", value: "test@example.com" });
machine.send({ type: "SUBMIT" }); // ✅ effectsを回し忘れない✨
8) 「send方式」にしたときの気持ちいいポイント💖
- UIは イベント投げるだけ → バグりにくい😍
- 仕様追加も event増やす→reducerに足す の一本道🛣️
- ログ・分析・テストがやりやすい(入口がsendしかない)🔍
- XStateみたいなライブラリも基本がこのノリだよ(send中心)📮 (GitHub)
9) ハマりどころ(先に潰そ🧯😆)
- ❌ Effectの中で直接state触っちゃう → ✅ 結果は必ずイベントで返してsend(成功/失敗をイベント化)
- ❌ sendの中でまたsendしまくって無限ループ
→ ✅ Effectは“非同期で返す”のが安全(
void runEffect(...)) - ❌ 「同じSUBMITを連打」問題 → ✅ 次章で、キャンセル・二重送信防止・requestId管理をやるよ⏳🧯
10) ミニ課題(手を動かすと一気に身につく✨)🎓
課題A:onTransitionフックを足す🔍
sendの中で、prevStateとnextStateをログしたい- 例:
opts.onTransition?.(prev, event, next)みたいにする
課題B:Effectに「遷移ログ」を追加📝
- 遷移するたび
{type:'log', message:'editing -> submitting'}をeffectsに積む - runEffectでconsole出す(本番はログ基盤に送る想定✨)
課題C:successになったら自動でRESET(3秒後)⏲️
- Effectに
{type:'delay', ms:3000, event:{type:'RESET'}}みたいなのを作ってみてね😊
11) AIに頼ると爆速になるプロンプト例🤖✨
- 「createMachineに onTransition と subscribe を追加して。初心者にも読みやすいコードで」
- 「Effectの型を増やしたい。toast / submitForm / delay を判別可能ユニオンで提案して」
- 「このsend方式の使いづらい点を指摘して、改善案を3つ出して」
- 「Reducerが純粋になってるかレビューして。I/O混入してたら指摘して」
12) まとめ✅(この章の持ち帰り)
- Reducer(純粋)+ Machine(薄いラッパー)で、send(event) だけの世界が作れる📮✨
- 副作用はEffectとして外へ出して、結果はイベントで戻すのがキレイ🧼
- 使う側が薄くなるほど、バグも減ってテストもラクになるよ〜☺️💖
最新情報メモ🗞️✨(本日時点の“いま”)
- TypeScriptは npm上の最新が 5.9.3(2025-09-30公開) と案内されているよ📦 (Npm)
- Microsoft公式の進捗では TypeScript 6.0は“橋渡し”で、既存JS実装の最終リリースになる予定だよ🧠 (Microsoft for Developers)
- Node.jsは v24がActive LTS、v22がMaintenance LTS など、複数LTSラインが運用されてるよ(最新セキュリティリリースも継続)🛡️ (Node.js)
次の第25章では、このsend方式に Loading / Timeout / Cancel をガッツリ足して「現実のアプリっぽい非同期」を完成させるよ⏳🧯💪